5 Deinstalling Oracle Data Service Integrator
For most platforms you can automatically remove system-installed, unmodified Oracle Data Service Integrator artifacts from your system. After Oracle Data Service Integrator has been uninstalled, you can manually remove any extra files, such as modified samples or other user-created files, which were not removed automatically by the deinstaller.
You should undeploy any Oracle Data Service Integrator applications before deinstalling Oracle Data Service Integrator from your system. For information about undeploying, see "Undeploying an Application or Module" in Deploying Applications to Oracle WebLogic Server.
To deinstall Oracle Data Service Integrator using Oracle Universal Installer:
-
Back up any data you want to retain for use with a new installation.
-
Shut down your server.
-
Run the deinstaller.
-
On Windows systems, choose the Uninstall Oracle Middleware option on the Windows Start Menu. The Uninstall Oracle Middleware option can be found on a path similar to the following:
Start > All Programs > Oracle > OracleHome > Uninstall Oracle Middleware
-
You can also start the deinstallation process from the command line. Navigate to the
<ORACLE_HOME>/oui/binfolder. Execute thedeinstall.cmdcommand for Windows platforms or thedeinstall.shcommand for Linux or UNIX platforms.
The Distribution to Uninstall screen appears.
-
-
In the Distribution to Uninstall screen, ensure that Oracle Data Service Integrator appears in the Select Distribution to Uninstall field. If it does not, select it from the drop-down list.
Figure 5-1 illustrates the Distribution to Uninstall screen. The screen displays the Oracle Data Service Integrator components that will be uninstalled. Click Uninstall.
Figure 5-1 Oracle Data Service Integrator Uninstall Screen

Description of "Figure 5-1 Oracle Data Service Integrator Uninstall Screen"
-
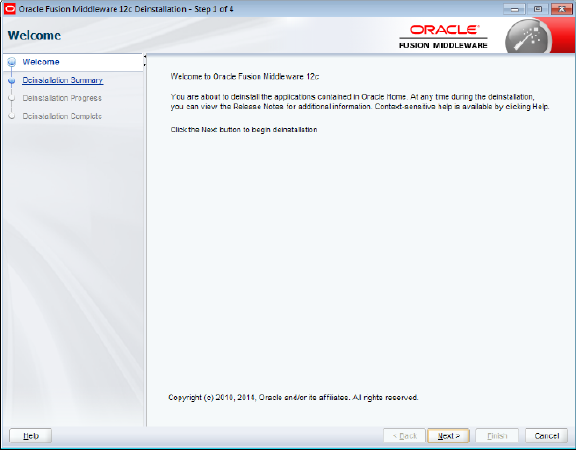
The Oracle Universal Installer Deinstallation wizard opens and displays the Welcome screen.
Figure 5-2 illustrates the Welcome screen. Click Next.
Figure 5-2 Deinstallation Wizard Welcome Screen

Description of "Figure 5-2 Deinstallation Wizard Welcome Screen"
-
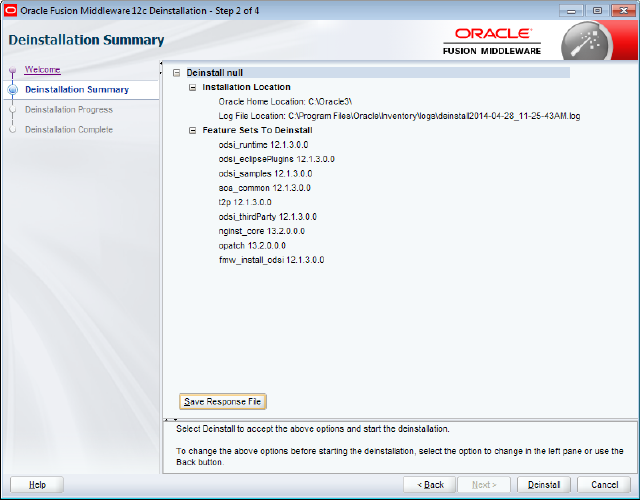
The Deinstallation Summary screen displays the components that will be deinstalled and their location in the filesystem.
Figure 5-3 illustrates the Deinstallation Summary screen. Click Save Response File to save a record of the deinstallation process. Click Deinstall to start deinstallation.
Figure 5-3 Deinstallation Wizard Deinstallation Summary Screen

Description of "Figure 5-3 Deinstallation Wizard Deinstallation Summary Screen"
-
The Deinstallation Progress screen displays the progress of the deinstallation process.
Figure 5-4 illustrates the Deinstallation Progress screen. Click View Messages to display the detailed messages that are sent during deinstallation. Click View Log to display the deinstallation log. Click Next to proceed.
Figure 5-4 Deinstallation Wizard Deinstallation Progress Screen

Description of "Figure 5-4 Deinstallation Wizard Deinstallation Progress Screen"
-
The Deinstallation Complete screen displays the Oracle Data Service Integrator components that have been removed.
Figure 5-5 illustrates the Deinstallation Complete screen. Click Finish to dismiss the Deinstallation Wizard.
Figure 5-5 Deinstallation Wizard Deinstallation Complete Screen

Description of "Figure 5-5 Deinstallation Wizard Deinstallation Complete Screen"